class: center, middle, inverse, title-slide # Rmarkdown and Other Productivity Tools for Math Teachers ## An Introduction
### Fei Ye
Department of Mathematics and Computer Science
### October, 2019 --- <style type="text/css"> .remark-slide table, .remark-slide table thead th { border-top: 0px; border-bottom: 0px; padding:0px; } .remark-slide table thead th[style] { padding-left: 0px !important; padding-right: 0px !important; } .remark-slide thead tr th, .remark-slide tr:nth-child(2n){ background: LightCyan; } table thead tr:empty{ visibility: hidden; } strong, b { color: DarkBlue; } .footnote { font-size: 80%; bottom: 0.5em; color: #c8e10b; } .remark-slide-content { padding: 1em 2em 1em 2em; } .DataTable tr:nth-child(2n){ background-color: white !important; } .latex-macros{ display: none; } </style> <div class="latex-macros"> `$$\require{color}$$` `$$\definecolor{purple}{RGB}{226, 15, 233}$$` `$$\definecolor{grey}{RGB}{177, 159, 149}$$` </div> # Books and Tools - [Pandoc: a universal document converter](https://pandoc.org/getting-started.html) - [R Markdown: The Definitive Guide](https://bookdown.org/yihui/rmarkdown/) - [blogdown: Creating Websites with R Markdown](https://bookdown.org/yihui/blogdown/) - [bookdown: Authoring Books and Technical Documents with R Markdown](https://bookdown.org/yihui/bookdown/) - [R Markdown Cookbook](https://dr-harper.github.io/rmarkdown-cookbook/) - [Rstudio](https://rstudio.com/products/rstudio/download/) - [Typora](https://typora.io/) - [Mathpix Snip](https://mathpix.com/) - [Symbolab](https://www.symbolab.com/) --- class: center middle # Markdown, LaTeX and Typora --- ## Features and Syntax of Markdown - I Markdown is a free markup language with simple formatting syntax. - Headers Headers are declared using `#` in markdown. ```markdown # This is a first-level header ## This is a second-level header ### This is a third-level header ``` - Format the text - For *italics text*, wrap the text with one star `*` or underscore `_` on each side: `*one star on each side*`. - For **bold text**, wrap the text with two stars `**` or underscores `__` on each side: `**two stars on each side**`. --- ## Features and Syntax of Markdown - II .pull-left[ - Add link or image - For links, put link text in brackets and the URL in parentheses: [Markdown Guide](https://www.markdownguide.org/getting-started). - Adding an image is similar to that of a link but with an exclamation mark at the beginning. For example, the code `` 
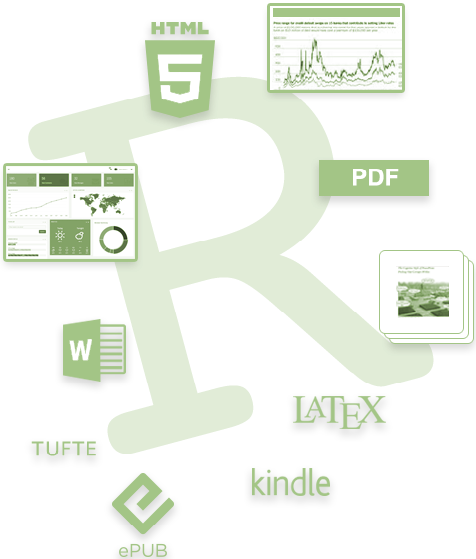
will add a local image. Change the path to a URL will add an online image. ] .pull-right[ .center[  ] ] --- ## Features and Syntax of Markdown - III - Create lists - Unordered list: add `-` or `*` at the beginning of the line to created an unordered list item. - Ordered list: add `n.`, where `n` is a number. - Task list: add `- [ ]` at the beginning. To add other elements, say paragraphs, in a (top level) list while preserving the continuity of the list, indent the element so that it is aligned with the content of items. For example, ```markdown - This is the first list item. 1. This is the second list item. This is another paragraph below the second list item. 1. This is the third list item. - [ ] this is a task list item. ``` - Horizontal Rule A horizontal rule can be created using three or more hyphens `-`, asterisks `*`, or underscores `_` in a line. In Rmarkdown, three or more hyphens are also used for other purpose, for example, declare a yaml header. --- ## Features and Syntax of Markdown - IV - Quotes and Code - A quotation should start with the `>` character at the beginning of each line. - A chunk of text enclosed by 3 apostrophes ` ``` ` at the beginning and 3 apostrophes at the end will be display as a code chunk. To add some features, you may specify the code language. For example, the following code is displayed in a code chunk in markdown language. ```markdown First define the function. Second evaluate the function at the given point. ``` **Note:** Indent the chunk of text by 4 spaces or more will also trigger the code chunk display. - Footnote To add a footnote, you may add a mark using `[^mark]` and add the footnote using `[^mark]: This is a footnote.`. However, this may not work with all markdown extension or variations. --- ## Features and Syntax of Markdown - V - Tables You may create a table in Markdown using the following form of syntax. .center[ ``` markdown | First Column | Second Column | | ------------ | ------------- | | Content Cell | Content Cell | | Content Cell | Content Cell | ``` ] To align content in cells of a table, you add `:` on the left, right or both sides of the hyphens in the header rule. .center[ ``` markdown | Left Aligned | Center Aligned | Right Aligned | | :------------------- | :----------------------: | --------------------: | | Left aligned content | centered aligned content | Right aligned content | | Row 2 | left centered right | $y=ax+b$ | | Col 1 R3 | $\sin x$ | $100 | ``` ] --- ## Mathematics in Markdown Markdown use LaTeX for writing mathematical expression. LaTeX syntax can be rendered into display math expressions using a certain TeX engine. Math expressions in Markdown normally are rendered by [MathJax](https://www.mathjax.org/), an online math diplay engine. LaTeX use dollar sign `$` to claim math environment. For inline math, use a pair of single dollar. For math in its own line, use a pair of double dollars. For example, `$f(x) = \frac{\sqrt{x}}{x^2+1}$` will be rendered inline as `\(f(x) = \frac{\sqrt{x}}{x^2+1}\)` and ```latex $$ F(t):=\int_0^tx\sin(x^2)\mathrm{d} x $$ ``` will be rendered as $$ F(t):=\int_0^tx\sin(x^2)\mathrm{d} x $$ **Note:** Do not leave a space between the `$` and your mathematical notation. --- ## Create LaTeX Syntax Using Desmos, Symblab, Maple, or Mathpix LaTeX has been adapted by many softwares for displaying math. There are also tools that can scan math formulas and convert them into LaTeX. Here are some I found useful. - [Desmos](https://www.desmos.com/calculator) You may type in a formula, linearly and when you copy it to markdown, you will see the LaTeX syntax. Indeed, this website is also good to create graphs for your course. - [Symbolab](https://www.symbolab.com/) Symbolab is a AI-driven website aim at provide step-by-step solutions and practice problems. Again, you may type in a math formula and copy paste in LaTeX syntax. - [Maple](https://www.maplesoft.com/support/help/Maple/view.aspx?path=latex) Maple has a command `latex(expression)` that converts a Maple input into LaTeX syntax. - [Mathpix](https://mathpix.com/) Mathpix is a powerful OCR tool that extracts LaTeX from PDFs or handwritten notes. A free account has a limit of extracting 50 formulas per month. For questions and basic tutorials on LaTeX using MathJax, you may check out the webpage https://math.meta.stackexchange.com/questions/5020/mathjax-basic-tutorial-and-quick-reference --- ## Introduction to Typora I You may write markdown in any text editor. However, it's better to find a markdown editor/viewer. One of my personal favorite is [Typora](https://typora.io/). - __*How to install?*__ Download the app from [Typora's webiste](https://typora.io/) and instal it by default. - __*Do I need to setup Typora*__ Basically, you don't. However, you may want to check if its syntax support includes math. - An example output (in html) with the .md file. .center[ <iframe src="Examples/HelloWorld.html" width="960" height="160"></iframe>
Download HelloWorld.md
] --- ## Introduction to Typora II Using Typora, you can preview what you wrote and easily export the markdown file into different formats of document. To do so, go to File->Export and choose the format that you would like to have. To get Word, you need to have [Pandoc](https://pandoc.org/installing.html) and Microsoft Word installed. .pull-left[ .center[ <img src="Figs/HelloWorld-PDF-Screenshot.png" width="100%" />
Download HelloWorld.pdf
] ] .pull-right[ .center[ <img src="Figs/HelloWorld-Word-Screenshot.png" width="100%" />
Download HelloWorld.docx
] ] --- class: center middle # R and Rstudio --- ## Tools First: Installation - What's R? R is a programming language and free software environment for statistical computing and graphics. - What's Rstudio? RStudio is an integrated development environment for R. - Installation Go to [R project website](https://cran.r-project.org/) and [Rstudio website](https://rstudio.com/products/rstudio/download/) download the latest version of R and Rstudio Desktop. ***Tip:*** It's better to install R to a different location instead of the default location, such as `C:\Program Files\R` on windows. --- ## Packages - The [rmarkdown package](https://cran.r-project.org/web/packages/rmarkdown/index.html) is necessary for producing different type of documents. The following packages are highly recommended if you would like to create an ebook, blog/webiste, or slides in html: - [bookdown](https://cran.r-project.org/web/packages/bookdown/index.html) - [blogdown](https://cran.r-project.org/web/packages/blogdown/index.html) - [xaringan](https://cran.r-project.org/web/packages/xaringan/index.html) For more useful packages, check out the webpage [https://rstudio.com/products/rpackages/](https://rstudio.com/products/rpackages/). - ***How to install packages?*** To install a package, you may type in the command `install.packages("package name")` in the Rstudio console and hit enter, or go to Tools->Install Packages to find and install a package. ***Tips:*** Don't install packages to the default local repository. Instead, create a `.Renviron` file to your home directory `~/` manually or using the function `file.edit('~/.Renviron')`, then add the library path `R_LIBS_USER="path"` to .Renviron, for example, `R_LIBS_USER="~/Rpackages"`. --- class: center middle # Rmarkdown, Blogdown and Bookdown --- ## Why Rmarkdown Rmarkdown adds many cool features to markdown. The first very important feature is that it handles LaTeX very well. Another highlighted feature is that it supports executable code chunk. .pull-left[ ```r par(mar = c(0, 0, 0, 0)) n = 76 set.seed(711) plot.new() size = c(replicate(n, 1/rbeta(2, 1.5, 4))) center = t(replicate(n, runif(2))) center = center[rep(1:n, each = 2), ] color = apply(replicate(2 * n, sample(c(0:9, LETTERS[1:6]), 8, replace = TRUE)), 2, function(x) sprintf("#%s", paste(x, collapse = "") )) points(center, cex = size, pch = rep(20:21, n), col = color) ``` ] .pull-right[ <img src="Introduction_to_Rmarkdown_files/figure-html/YihuiArt-1.png" width="1650" /> ] .footnote[The piece of codes belongs to [Yihui Xie](https://yihui.name/), one of the creators of Rmarkdown and other wonderful R packages.] --- ## A Typical Structure of Rmarkdown Document - YAML header YAML is a data-serialization language which is normally used to store configuration information. At the top of each RMarkdown file, there should be a YAML header section enclosed by `---` which controls the output format and appearance. ```yaml --- title: "Hello R Markdown" output: html_document --- ``` - Code Chunks Rmarkdown calls the package `knitr` to process code chunks. Indeed, `knitr` converts all of the code chunks, code and output into text and markdown which will be further handle by Rmarkdown packages and Pandoc to produce a variety of outputs. - Markdown --- ## Create Rmarkdown Documents .pull-left[ - Create Rmarkdown from a template
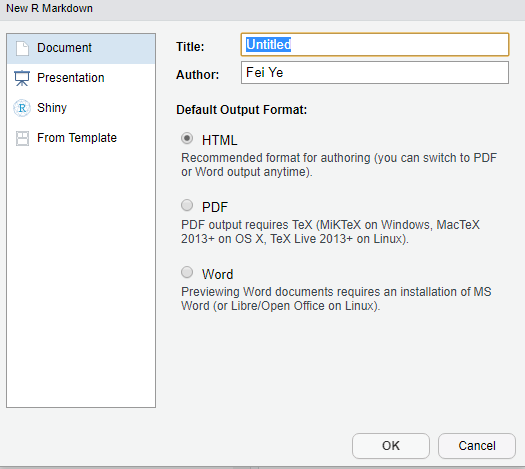
 In Rstudio, go to `File->New File->R Markdown` .center[  ] ] .pull-right[ 
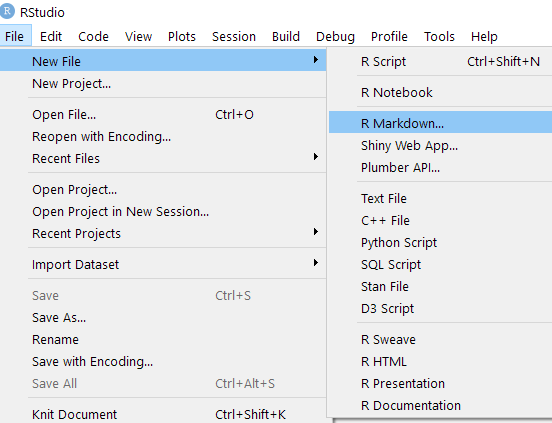
In the pop out window, choose the type of document and click OK. .center[  ] ] --- ## Rendering 
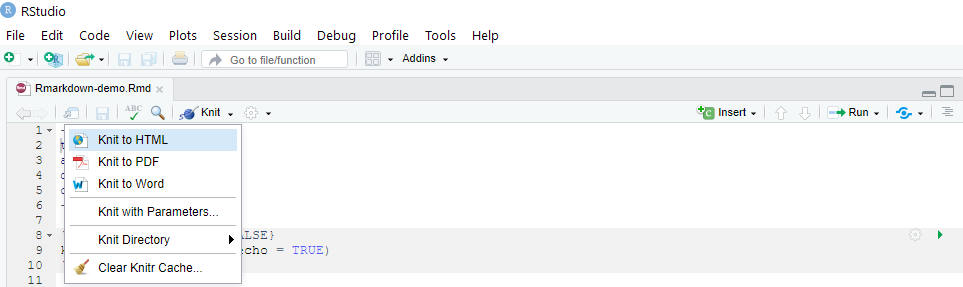
To convert your markdown file into a type of document as you defined in the YAML header, click the `Knit` button that appears above your file in the editor. You may also use the dropdown menu next to the `Knit` button to produce other type of documents .center[  ] --- ## 
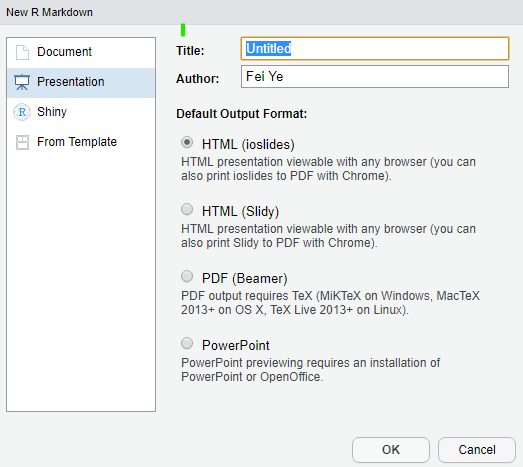
Rmarkdown Presentations 
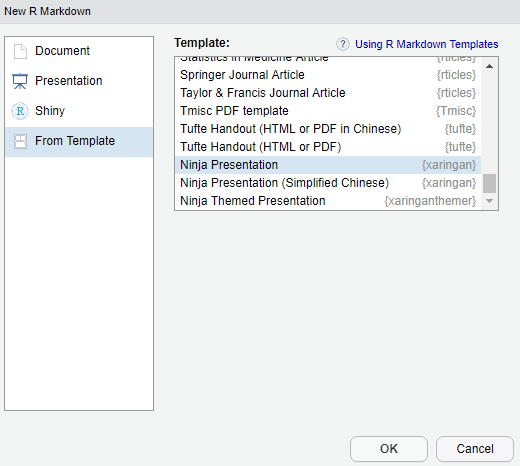
Using Rmarkdown to create presentations are quite easy. You may start with a default presentation template. I like to use [Xaringan](https://slides.yihui.name/xaringan/). A template can be found in `From Template`. .pull-left[ .center[  ] ] .pull-right[ .center[  ] ] --- ## Save a Webpage as PDF Using Google Chrome browser, you can save any webpage as pdf. This is very useful for sharing Xaringan presentations if you don't want to publish them online. Press `Ctrl+P` or choose `Print` from the menu, then in the pop up windows, choose `Save As PDF` in the dropdown menu for destination and click `Save` to save. .center[  ] --- ## Blogdown - Blogdown uses the static site generator [Hugo](https://gohugo.io/) to create websites. To install Hugo, run the command `blogdown::install_hugo()` in Rstudio Console. - You may create a new website from `File->New Project` or run the command `blogdown::new_site()` in a newly created project. .pull-left[ .center[  ] ] .pull-left[ .center[  ] ] - 
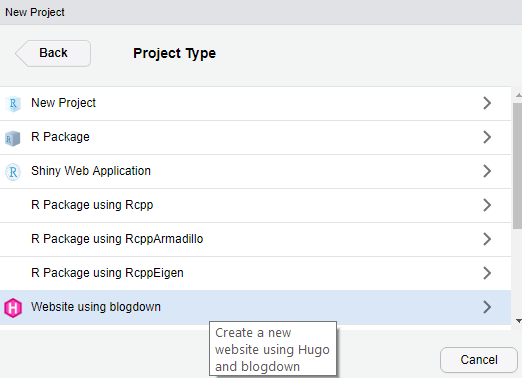
A detailed guidance can be found in the blogdown book [blogdown: Creating Websites with R Markdown](https://bookdown.org/yihui/blogdown/). --- ## Bookdown - Bookdown can be used to create books in pdf, html, epub and other format. - A bookdown may be created from `File->New Project` or run the command `bookdown::bookdown_site()` in a newly created project. .center[  ] ] - 
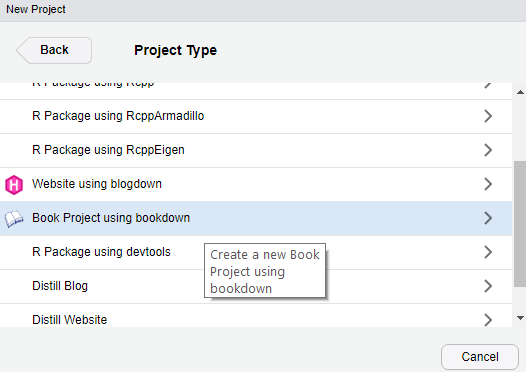
Examples and the bookdown book can be found on the [Bookdown website](https://bookdown.org/). --- ## Exercise 1. Create a Rmarkdown document and convert it into a document that you like. 2. Create a presentation in a format that you like. 3. Save the current presentation as a pdf file. ***Instruction:*** If you don't have your desktop App ready, you may use the RStutio Cloud. .center[ [Click to create an account on Rstudio Cloud](https://login.rstudio.cloud/register?redirect=https%3A%2F%2Fclient.login.rstudio.cloud%2Foauth%2Flogin%3Fshow_auth%3D0%26show_login%3D1%26show_setup%3D1) ] I will invite you to join a my shared space in the classroom. For an alternative of Typora, you may try the online markdown editors [stackedit.io](stackedit.io) or [dillinger.io](dillinger.io). <!-- --- --> <!-- ## Some Useful Resources for Rmarkdown --> <!-- - [Introduction to R Markdown](https://rmarkdown.rstudio.com/articles_intro.html) --> <!-- - [R Markdown Basics](https://stats.idre.ucla.edu/stat/data/rmarkdown/rmarkdown_seminar.html#(1)) --> <!-- - [Getting Started with R Markdown](https://ourcodingclub.github.io/2016/11/24/rmarkdown-1.html#create) --> <!-- - [Introduction to `knitr`](https://sachsmc.github.io/knit-git-markr-guide/knitr/knit.html) --> <!-- - [Presentation Ninja](https://slides.yihui.name/xaringan/#1) --> <!-- - [http://www.favstats.eu/post/xaringan_tut/](http://www.favstats.eu/post/xaringan_tut/) --> --- class: middle center # Git and Github --- ## What is Git and How to Use it - Git is an Open Source Distributed Version Control System. A version control system records changes to a file or set of files over time so that you can recall specific versions later. A distributed control system build a mirror connection between local computers and servers. - Setup [Download git](https://git-scm.com/downloads) and then install it to you computer. - For a brief introduction on how to use it (in command line), please read the article [git - the simple guide](https://rogerdudler.github.io/git-guide/) or [An introduction to Git: what it is, and how to use it](https://www.freecodecamp.org/news/what-is-git-and-how-to-use-it-c341b049ae61/). - In practice, we use [git GUI Clients](https://git-scm.com/download/gui/windows), for example, [Github Desktop](https://desktop.github.com/). --- ## What is Github and How to Use it - GitHub is a code hosting platform for version control and collaboration. - Github can be used to host your websites (on github pages). - Basic Usage You may create and manage your repositories on github.com. I mainly use the Github Desktop app to perform the following actions: `init`, `commit`, `push`, and `fetch`. - `init` creates an new repository. - `commit` update changes to local computer. - `push` send updated local changes to the server. - `fetch` download newer changes on server to local computer. If you created a repository on github.com, you may `clone` it to local computer. --- ## Publish (Static) Websites via Github Pages - Create a GitHub repository named `username.github.io`. It can be an empty repository, it can also be a full personal website. - You can also choose to publish your project site from a different branch or folder. To let Github automatically publish the project site, the branch should be names as `gh-pages`, and the folder should be named as `docs`. - For more details, please read the article [Configuring a publishing source for your GitHub Pages site](https://help.github.com/en/github/working-with-github-pages/configuring-a-publishing-source-for-your-github-pages-site). - For a free account, only public repositories can be published via Github pages. To solve this problem, it is recommended to use [Netlify](www.netlify.com) how publish project websites from a Github repository. See [the blogdown book section 3.1](https://bookdown.org/yihui/blogdown/netlify.html) for details. --- class: middle center # .blue[Thank You!]